Table of contents
When I started my job as a content marketer 9 months ago, I was shocked by the number of hours I wasted on formatting blog posts in WordPress.
Yes, I am a perfectionist, so I know the value of a readable, visually-appealing post.
But, when I spent all day on manual, mind-numbing tasks like copying and pasting, re-linking, flipping between windows and fixing spacing… well, that really sucked the fun out of the job. Since Databox is an automated reporting tool for marketers, I was especially sensitive to painful workflows that should no longer exist in 2017.
Instead of spending hours on following a 10-click sequence to upload and format one image at a time, I would rather…
- Do SEO research for valuable keywords
- Promote my content
- Start another post!
WordPress has very few features built-in to make publishing easy, so I needed to find a few plugins. I wanted to keep my quality standards high while eliminating all the mentally exhausting tasks. Sounds easy… right?
Now, when I publish a post like this with 25+ images, I can spend all my energy on writing compelling copy, not manual labor.
Here are the areas that I chose to optimize. In each one, I will show the absurdity of the default WordPress workflow, and how I fixed it with a plugin.
Plugins For Common Problems
- Uploading Images
- Optimizing Images
- Importing Content From Google Docs
- Making Links Open In A New Window
- Adding Guest Authors
Uploading Images
The Problem: We like to include a lot of images in our posts to make them easier to read. Some of these are self-created in Illustrator, others are found on the Internet, and still others are screenshots that we create locally. If you want to upload an image, here are the steps:
- Click the image
- Drag it onto your Desktop to quickly save it locally
- Switch the window to WordPress
- Click the “Add Media” button
- Find the image on your desktop
- Drag the image onto the screen
- Click “Insert Into Post”
That’s seven steps times for each image. Some of our longer posts have 30 images, so I will need to go through 210 total steps. And keep in mind, these images will be un-optimized, so they will slow down page loading times.
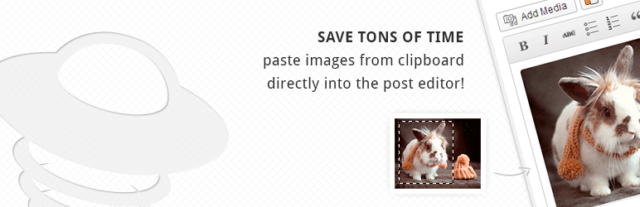
The Solution: Image Elevator
Image Elevator lets you paste images directly into the WordPress editor. There is no flipping screens or dragging and dropping. Here is the process:
- Right-click the image
- Click “Copy Image”
- Switch the window to WordPress
- Paste the image using Cmd+V or Ctrl+V
For 3o images, that is still 120 steps. So why is it so much better?
Well, each step has a “cognitive load“. That means that different types of tasks create different levels of strain on writers’ brains.
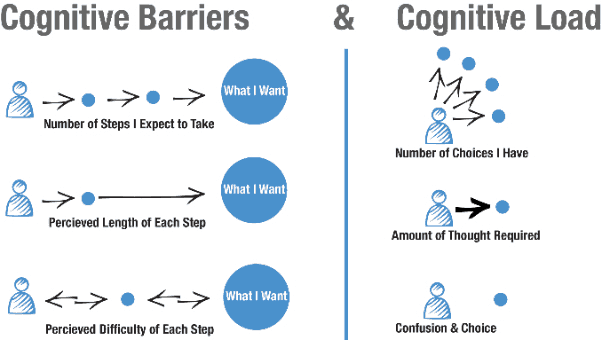
So, when you need to remember 7 steps in an exact sequence, with multiple examples of dragging/dropping and moving your mouse across the screen to find a small button… your brain becomes exhausted. But, when you can eliminate all the dragging and dropping and searching for buttons in an exact location on the screen… your brain does not get tired as quickly.
Important Notes: Image Elevator imports images wrapped in a paragraph tag. So, depending on your stylesheet in WordPress, you may need to go into the HTML editor and delete all the <p> tags. I use the Search and Replace Chrome plugin to do this.

Optimizing Images
The Problem: Page load time is a factor in Google’s PageRank algorithm. It is especially important for mobile users, which may not have strong Wi-Fi like desktop users. If you want your post to load quickly, you need to make image files as small as possible. Unfortunately, if you’re using pictures from other sites or creating GIFs, you may get a couple unpleasant surprises when you realize that your post contains large, slow-loading images.
If you save all pictures to your desktop (like I used to), you can add an extra two steps to your uploading process using the ImageOptim Mac app!
- Drag the image onto the ImageOptim Window
- Wait 5-10 seconds for it to be optimized
Since I didn’t like a 7-step upload process… I certainly did not enjoy a 9-step process. I wanted images to be immediately optimized as soon as I added them to WordPress so that I did not need to think about this step.
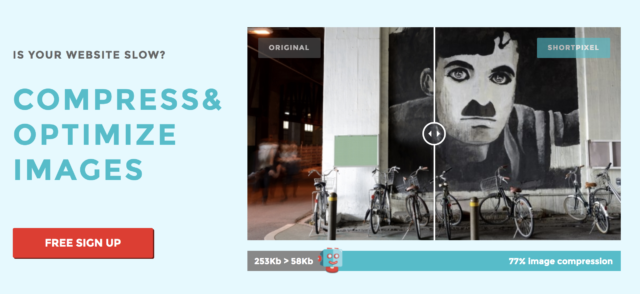
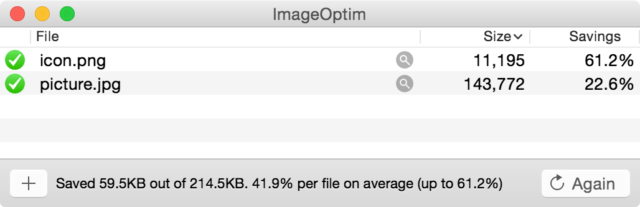
The Solution: ShortPixel Image Optimizer
Once you install ShortPixel, every single image gets optimized as soon as you upload it. It cuts image size down by an average of 75%. One less thing for you to think about!
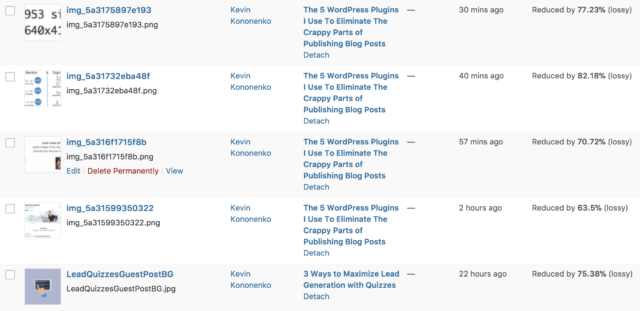
Important Notes: ShortPixel has a series of settings you can change. The most important one is “lossy” compression. This type of compressions will create an image that looks the same to the human eye, but has the biggest reduction in file size.

Importing Content From Google Docs
The Problem: We prefer to use Google Docs for any post that will involve multiple people. This could be a guest post that I will edit, or a post that was written by me and edited by our CEO, Pete. The collaborative tools are perfect for the editing process. But, there was no good way to get that content into WordPress without fixing the formatting of every line.
Directly copying from Google Docs and pasting into WordPress will insert junk code into the HTML that affects styling.
We also tried pasting into Notepad to remove all the junk code. But, that also removes all styling, so we then needed to add all the links and headers back into the post.
We host our own instance of WordPress, so we could not use the WordPress plugin for Google Docs.
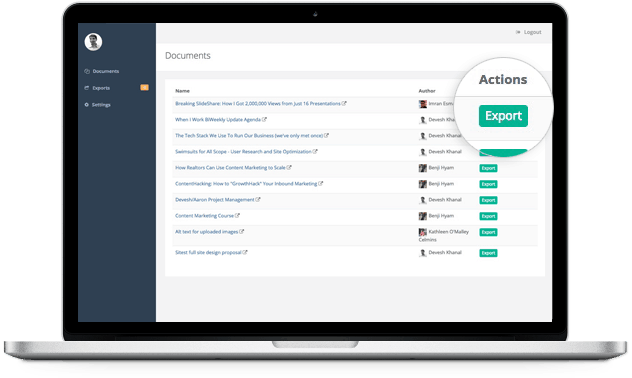
The Solution: Wordable
Wordable will directly import a Google Doc into WordPress and maintain all formatting. And, it includes all the images in the post as well.
For me, this was the most painful step of all. Many of our posts exceed 3,000 words in length and contain multiple headers, blockquotes, bolded phrases, italicized words… the list goes on. When I needed to redo all this formatting in Google Docs, I was forced to focus intensely for an hour as I copied formatting and links.
Wordable creates a clear workflow: Google Docs for editing and formatting, WordPress for final touches and publishing.
Here is our full summary of how to use Wordable.
Making Links Open In A New Window
The Problem: When users click a link in your post that directs them to an external site, there is a slim chance that they will later click the “Back” button and read the rest of your post. So, you need to open a new tab every time they click an external link. Unfortunately, the default WordPress setting forces you to set this manually on every link. That is a lot of time spent on checking boxes.
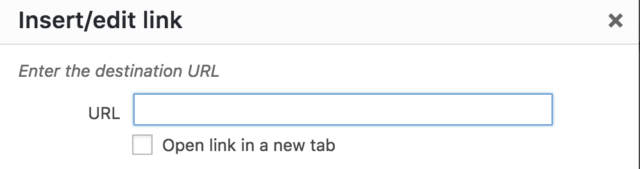
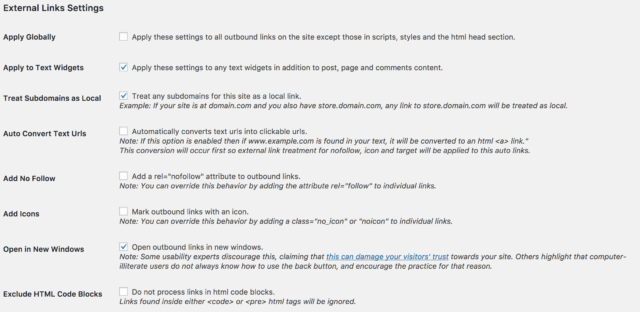
The Solution: External Links
Once you download this plugin, all external links automatically open a new tab. You can also change settings like the “nofollow” attribute in its Settings menu.
Adding Guest Authors
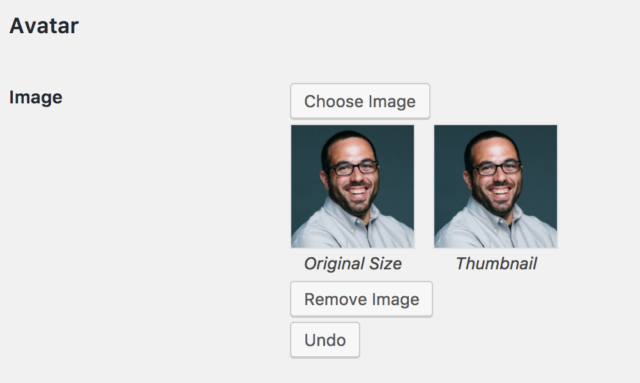
The Problem: We want to make sure our guest authors get the publicity they deserve. Unfortunately, WordPress only allows you to add a user image via Gravatar. Some guest authors already have a Gravatar account, while others do not. This creates an unnecessary delay in the publishing process. We could publish posts from guest authors without images, but that makes them seem like second-class citizens.
The Solution: WP User Avatar
The plugin is pretty simple- it changes the default settings around user creation in WordPress. Now, you can upload images for each user directly.
Final Thought
If you set monthly marketing goals, you can’t waste time on manual tasks that will not even improve the quality of your posts! Perhaps more importantly, you can’t spend time on tasks that drain your energy and do not improve your numbers!
We love finding ways to make marketers more efficient. If you have another tool that makes your life much easier, please share it with us here! You will get a link and a mention in our final article.