Table of contents
Your content is high-quality and you’ve earned tons of backlinks, but you’re still not ranking highly in search.
You suspect that your site’s slow loading speed is the culprit behind your static rankings, but when you run your site through a tool that tests its speed, none of the recommendations make any sense at all.
As Sky Alphabet Social Media’s Steve Yanor says, “website speed optimization can get very technical very quickly.”
And while you may ultimately need the help of a technical SEO specialist and some skilled developers to find and fix all of the issues that are dragging down your page load speeds, there are some things that non-technical marketers and business owners can do to speed up their sites without touching a line of code.
To help you improve your site’s speed without development help, we asked 170 performance experts to share website speed optimization tips that anyone can implement—no technical knowledge required. They recommended the following 15 tips:
- Test Your Site’s Speed
- Optimize Your Images
- Implement Lazy Loading for Images
- Delete Unnecessary Images, Videos, and Slideshows
- Use Only the Media You Truly Need
- Move to a Lightweight WordPress Theme
- Use Only the Plugins and Tools You Absolutely Need
- Keep an Eye on Ad Loading Speeds
- Minimize Redirects
- Upgrade Your Web Host
- Ask Your Hosting Provider for Help
- Use a Premium DNS Provider
- Use a Content Delivery Network
- Enable Caching
- Implement Accelerated Mobile Pages (AMP)clo
1. Test Your Site’s Speed
The first thing to do when optimizing your website’s speed is to determine if there’s a problem that needs to be fixed. You can do this by running your site through a page speed testing tool (more on those below) and seeing how long your site and its pages take to load.
According to our respondents, you want to aim for loading speeds between two and three seconds:
“Customers expect your website to load in at least two seconds, and 40% of internet visitors will leave your site if it takes more than three seconds to populate,” says Sameer Somal of Blue Ocean Global Technology.
What Are the Best Page Speed Testing Tools?
So what tool should you use to test your website’s load speeds? We asked our respondents to name their favorite tools: Google’s PageSpeed Insights was the most popular tool, followed by GTmetrix, Pingdom, WebPageTest, and Google’s Lighthouse.
“To check where you currently stand and find out what improvements you can make, combine the use of two great tools—Lighthouse and GTmetrix—which will give you insight into your current standing and your future potential,” says Ashley McNurlan of Medicare Plan Finder.
“A score of 70+ is good in Lighthouse, though 80+ is best. A page load speed of 3.5 seconds or better is optimal, whereas if you are at eight seconds or worse, you need serious optimization work done to your website,” McNurlan says.
Lana Volkov of SERP Wolf recommends Pingdom: “It’s free and easy to understand what improvements need to be made to increase page load speeds.”
However, Sky Alphabet Social Media’s Steve Yanor says you’re better off using the free tools that Google provides to test your site’s performance and find issues:
“You would be well advised to stick to Google’s tools since some of the other tools can give wildly optimistic and inaccurate readings about page load speed. Google has gone to great lengths to expand its diagnostic toolset so that website owners can determine what’s slowing a site down.”
“There are two places you can look. First, with the website loaded, navigate to the audit tool available in every Google Chrome browser (right-click > “Inspect” > “Audits”).
“The audit tool will give you information on how to fix your problems, but a lot of the remedies are outdated and not at all helpful.”
“The second—and frankly better—tool to use is the “Coverage” tool available in Google Search Console. This is a better tool because it uses actual crawl data to show you the most recent errors. You can then click on the errors and drill down into what is turning off Googlebot.”
“This is really important because Google does not have unlimited resources to crawl your website every day. If it hits an error, it will go away and come back another day. This means your webpage doesn’t get indexed. And if it doesn’t get indexed, it doesn’t show up in search results,” Yanor says.
Related: Conduct a DIY Technical SEO Audit with These 17 Questions
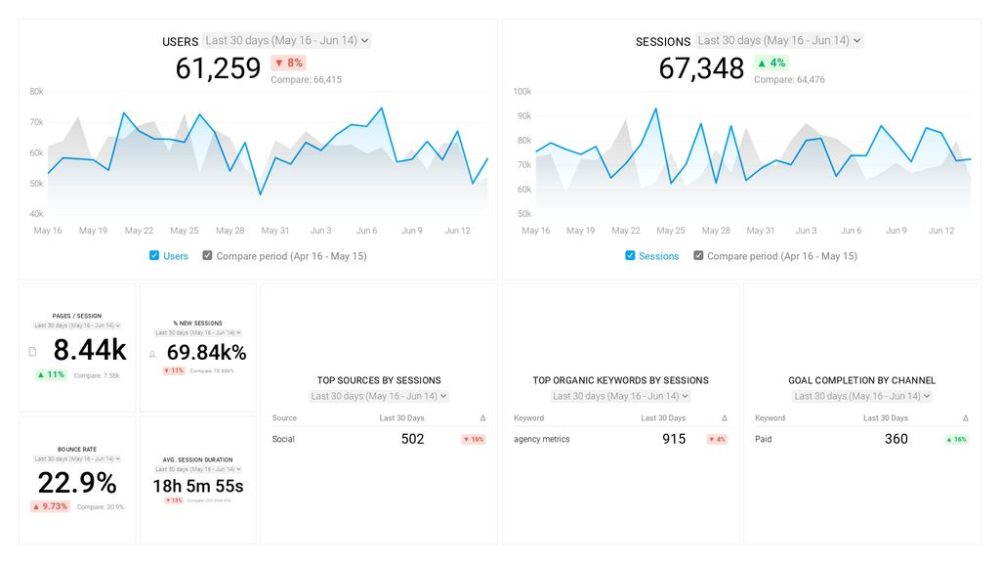
PRO TIP: How to track these 10 popular Google Analytics 4 metrics
Sure, there are dozens (and dozens?) more Google Analytics 4 metrics you could track. But, starting with these 10 commonly tracked metrics will give you a pretty high-level view of how your marketing is working…
- Sessions: The number of sessions can tell you how many times people are returning to your website. Obviously, the higher the better.
- Sessions by organic keyword: Which organic keywords bring in the most traffic to your website? This may help you determine whether your SEO investments are paying off.
- Bounce rate: Do visitors leave shortly after landing on your website? Or do they stick around?
- Average session duration: How much time are people spending on your website? Users with a high average session duration are most likely relevant to your company.
- Goal completions: How many users responded to your call to action?
If you want to track these in Google Analytics, you might find the visualizations limiting. It’s also a bit time-consuming to combine all the metrics you need in one view.
To better understand how your website performs in terms of traffic growth and conversions, we’ve made this plug-and-play dashboard that contains all the essential metrics for understanding how successful you are at optimizing different aspects of your website.
You can easily set it up in just a few clicks – no coding required.
To set up the dashboard, follow these 3 simple steps:
Step 1: Get the template
Step 2: Connect your Google Analytics account with Databox.
Step 3: Watch your dashboard populate in seconds.
2. Optimize Your Images
If you’ve determined that you do, in fact, have slower-than-recommended loading speeds, the simplest place to start is with image optimization.
“The one tip I’d provide to a non-technical marketer who is looking for ways to improve page load speeds is to mind your image sizes,” says Cary Haun of Page 1 Solutions.
“Think of image sizing like the way a physical printer works. Full-color, giant-sized images take forever to print, right? It also uses up a lot of resources, such as time and toner. Poorly sized images on your website basically do the same thing.”
“If your page has images,” Haun says, “make sure they are optimized for the web.”
Our respondents offered several recommendations for optimizing your website’s images.
Size Your Images Properly
“Often, people will just grab an image off of a site like Unsplash and upload it,” says Gabriel Bertolo of Radiant Elephant. “These images are typically much larger than you need and are often in print resolution—300 DPI—rather than web-resolution, which is 72 DPI.”
“If you’re using an image as the banner image for a web page, it doesn’t need to be wider than 1,500 pixels with a DPI of 72. If you upload a 300 DPI picture that is 4,000 pixels wide, that page is going to load slowly.”
“By properly optimizing images, I have seen sites drop gigabytes of size and increase load speed by up to a second,” Bertolo says.
Nicholas Tippins of Beyond PhD Coaching says to “look at the size that the images on your site actually appear and resize them accordingly. I recommend choosing a reasonable standard size for images that appear on your blog posts and resizing all the images you upload to match that.”
Our respondents recommended several tools for resizing your images:
- “You can resize images quickly and easily in Photoshop or even Microsoft Office Suite’s photo-editing tools.” (Kimberly Dioszeghy, Reliance Foundry)
- “You don’t need an expensive tool to resize images. Microsoft Paint will do the job.” (Marcus Clarke, Searchant)
- “You can use an image-optimization program like GIMP, which is free. (Angela Han, Sharp Growth Digital Marketing)
Download the Appropriate Stock Photo Size
“Many times, stock photography online can be downloaded in multiple sizes,” says Kassie Herlong of Zippy Shell Louisiana. “Rather than downloading the largest versions of these files, I like to download the medium range and try to keep every photo under 500KB.”
Brian Casey of IMPACT Branding & Design agrees: “In Shutterstock, when you go to edit a photo, you can select to download it in a web format at 72 DPI or the standard 300 DPI (print version). Choose the web-sized version.”
Use the Right Image Format
The format your images are in can also impact how large your images are and how long they take to load.
Zarar Ameen of CANZ Marketing offers this advice: “Use PNGs for graphics that are less than 16 colors and JPEGs for photographs.”
However, Mac Whitney of Page 1 Solutions says to “only use PNG when transparency is required.”
And Weidert Group’s Jonathan Stanis says that “pictures should be JPEGs, simpler graphics should be PNGs, and other single-color icons should be SVGs.”
If you need to convert your images to different formats, Josep M Felip of SEO for Humans recommends using Jpeg.io: “It does a fantastic job. All you need to do is drag and drop your image to the browser window.”
“I have a client who runs a travel company, so his site has to use lots of high-quality images to attract visitors,” says Techjackie’s Jackie Owen. “His site took an average of 25 seconds to load.”
“When I investigated the site, I found out that the majority of the images were PNGs. I converted all of them to JPEGs and compressed all of the images. After this tedious process, I was able to reduce the page load speed to four seconds,” Owen says.
Avoid Duplicating Images
Sometimes, you may want to use the same image on multiple pages of your site (or in multiple blog posts). When this is the case, Anne-Héloïse Pagliardini of AHBC Group says to “make sure you avoid duplicating images.”
Instead of uploading an image you’ve already used two, three, or four additional times, just find the image you’ve already uploaded and add it to the page/post you’re creating/updating.
Compress Your Images
“My best tip for improving your page loading speed is to compress your images,” says Growth Hackers’ Jonathan Aufray. “There are many free online tools to reduce the size of your images without losing quality.”
Our other respondents recommended several of their favorite image compression tools:
- “Compressing images is easy, even for a beginner. You can use TinyPNG to manually compress images before adding them to a site.” (Anna DiTommaso, Creative80)
- “Send the image through an optimization service such as TinyJPG to shrink the size of the image.” (Theory Georgiou, Appleton Creative)
- “You can use free tools online like Optimizilla.” (Bret Bonnet, Quality Logo Products)
- “I use a desktop application called ImageOptim to compress all my image file sizes. If the image size is particularly large, I use free online tools like Pixlr Editor to resize images to match the desired image size.” (Hailey Vasquez, Odd Dog Media)
- “While you’re in Photoshop, make sure to use the “Save for Web” feature, which compresses the size of the file.” (Wes Marsh, eRep)
- “Use a compression tool like Compressor.io.” (Jackie Tihanyi, Fisher Unitech)
- “If you’re able to, size the image to the proper dimensions and then use a tool like Squoosh to compress the file before uploading it to your website.” (Eli Gieryna)
“No matter your level of technical expertise, this is an easy workflow anyone can implement to boost their page speeds,” Gieryna says.
Replace Oversized Images
To find too-large images you’re already using on your site, John Holloway of NoExam recommends “running your page through GTmetrix to identify any images that are oversized.”
“Then, resize the images to be appropriate height and width for your page and run those images through an image compressor. Replace the oversized images on your website, and then run another test on GTmetrix to see your improvements,” Holloway says.
Andres Tovar of Noetic Marketer agrees and recommends this workflow:
- “Download all the images of the page you are trying to optimize.”
- “If you have PNG images that do not need to have transparency, convert them into JPG.”
- Go to TinyJPG and upload all your images, including JPG and PNG files. This will compress your images as much as possible while keeping the resolution high.”
- Replace your old pictures with the freshly compressed ones.
“By following these steps, I have optimized pages that take over 10 seconds to load to below the five-second mark,” Tovar says.
Use an Automatic Image Compression Tool
If manually downloading, resizing, compressing, and reuploading every oversized image on your website sounds like a task you’ll never find time for, you can also use an automatic image compression tool that minimizes the size of all of the images currently on your site as well as any new images you upload.
Here are a few of our respondents’ favorite automatic image compression tools:
- “For WordPress websites, I’d recommend installing a plugin called ShortPixel. It’s free and provides lossless compression to photos. There’s also a paid upgrade option for sites with a high volume of photos.” (Karen Julia, Photo SEO Lab)
- “Non-technical individuals can really benefit from Smush—a WordPress plugin.” (Kyle Theil, Visual Realm)
- “Tools like Kraken.io make it easy to resize and compress images and have a major impact on page speed.” (Scott Brown, Digital22)
- “If you’re using WordPress, download the EWWW Image Optimizer.” (Bethany Spence, Exposure Ninja)
3. Implement Lazy Loading for Images
“I’m a big fan of lazy loading for images,” says Mr. SR of Semi-Retire Plan. “This is when a website does not preload all of the images on the page; instead, it only loads what’s visible. Then as users scroll, it loads the new images as they enter the window. This can cut down significantly on load time.”
“If you use WordPress, there are a lot of free plugins available that can do this for you. I personally use Autoptimize and have found it to be extremely helpful. In addition to lazy loading, the plugin can help to compress images to reduce their file sizes,” SR says.
Google also recently released its own WordPress lazy loading plugin called Native Lazyload.
4. Delete Unnecessary Images, Videos, and Slideshows
Another option if you don’t want to have to resize and compress all of your site’s media is to just delete any media that isn’t absolutely necessary.
“Get rid of unnecessary images, videos, or sliders on your key pages,” says Ben Johnston of Sagefrog Marketing Group.
“These elements increase the time until your first meaningful paint, i.e. the time before the primary content on your page starts loading. So getting rid of those that don’t serve a central purpose can grant you a quick, easy speed boost,” Johnston says.
Srajan Mishra of TSI Apparel agrees and recommends “assessing all of your pages for any images that aren’t required and removing them.”
5. Use Only the Media You Truly Need
“There’s one thing that absolutely any marketer can do to improve page load speed,” says Andrew McLoughlin of Colibri Digital Marketing. “Put less stuff on each page.”
“Don’t try to cram images and page elements onto every single page. Just keep your site simple, direct, and clear.”
“A tidy menu with fewer options and no frilly animations will be better for your users, will load in record time, and will springboard any other bit of content in a click or two,” McLoughlin says.
6. Move to a Lightweight WordPress Theme
“If you’re on WordPress, the easiest way to dramatically speed up your page load is to change to a lightweight theme,” says Marko Saric. “Some themes are just impossible to work with as they load tons of scripts, fonts, and other third-party requests.”
“On the other hand, some themes are built with speed in mind. GeneratePress, Astra, and Arke are three of the ones I can recommend. Just switching to one of those themes will bring you close to scoring top grades in any of the speed-testing tools,” Saric says.
Alistair Dodds of Ever Increasing Circles agrees: “Pick a theme that is not too large or ask your developer to custom-code the site. It will cost a little more upfront, but in the long run, your site should run faster.”
“Commercial WordPress templates are often built with all sorts of features and options you will most likely never need or use. However, those same features will be called by users’ browsers, which will impact server response times,” Dodds says.
7. Use Only the Plugins and Tools You Absolutely Need
When you’re trying to optimize your site for speed, avoid bloating your site with plugins and add-ons,” says William Chin of PickFu.
“Plugins, add-ons, and external script libraries are great for non-technical users because they’re easy to install and need little-to-no development triaging. However, there are downsides to using these tools. In particular, if you use too many plugins or tools, your site’s speed will hit rock bottom,” Chin says.
Many other respondents agreed and offered the following recommendations.
Audit Your WordPress Plugins
“If your website is built on WordPress and uses plugins, I would suggest that you conduct a plugin audit—especially if your site has been around for a number of years,” says Tim Stobierski of Pepperland Marketing. “WordPress sites have a habit of accruing plugins over time.”
“These plugins can be incredibly helpful if you can’t afford custom development work and are not a coder yourself. But each of these plugins can add anywhere from a couple-hundred milliseconds to multiple seconds to your page load speed, depending on their size and level of bloat.”
“Also, though you may install a plugin in order to achieve a goal on a single page (for example, an events plugin) in reality it could be launching on every page of your website. The result is that what was once a spry, speedy young site has become laden with baggage and sore knees. It just can’t move the way that it used to.”
“Does this mean that you should deactivate all plugins? No. But you should look at what you have installed and determine if there is anything you no longer need or no longer use. If so, deactivating those plugins can likely offer a small—but quick—speed win,” Stobierski says.
Dhruv Mehta of The Next Scoop agrees and says, “There are plugins like Query Monitor and Plugin Performance Profiler that can be used to check the speed of all of your site’s plugins. You can remove these plugin checkers after a successful analysis.”
Delete Unnecessary Third-Party Tools
“With so many third-party technologies (e.g. live chat, personalization, customer reviews, etc.) available today, it’s easy to just keep adding new features and functionality to a site without much thought as to how those technologies will impact your site’s performance,” says Yottaa’s Alicia Bloom.
The solution, according to Solodev’s Scott Madara, is to “take note of your third-party tracking scripts and only use what’s absolutely necessary.”
“More often than not, third-party tracking tools like Facebook pixels, AdRoll pixels, and other tracking mechanisms slow a website’s page speed. And because they are third-party resources, your development team won’t be able to optimize them,” Madara says.
“Every quarter, I do a quick tool audit and delete all of the unused/inactive apps,” says Marketing Consultant Tamas Torok. “This helps me maintain a healthy page loading speed.”
If You Can’t Delete a Plugin/Tool, Only Use It On Necessary Pages
If you can’t delete a tool, Mailshake’s Mark Lindquist recommends “only adding plugins or software to pages where it’s absolutely necessary.”
“For instance, we use Drift’s chatbot on our website, but we turned it off on the blog. However, the code was still loading on our blog, which slowed our page speed significantly. So we kept the code on our main site but removed it from our blog, and it made a significant difference in our page load speeds,” Lindquist says.
If the tool you only want to run on a few pages of your site uses a WordPress plugin, Fitness Savvy’s Robin Young says you can use Plugin Organizer to “de-select plugins that are not required for certain pages, set various rules, and set the order in which the plugins load.”
It’s worth noting that the description for Plugin Organizer says “reordering or disabling plugins can have catastrophic effects on your site, causing issues with plugins and rendering your site inaccessible,” so if you decide to try this approach, do so with caution (and site backups).
8. Keep an Eye on Ad Loading Speeds
If you run ads on your site, Paul Moyer of SavingFreak says to “watch your ads. Ad technology is great for earning money, but it can really bog down your site and ultimately hurt your bottom line.”
“I was using one ad network that was adding five seconds to my load time. Many times you can talk to your ad network and get them to make adjustments to show fewer ads or to lazy load the ads once the user scrolls close to them,” Moyer says.
9. Minimize Redirects
Mike Falahee of Marygrove Awnings recommends that you “minimize redirecting. Redirecting requires additional processing time and will waste precious seconds of users’ time.”
One way to minimize redirects, according to Automate.io’s Rohit Chavane, is to “make sure, when adding internal links, to link to the exact URL of the page without missing HTTPS or WWW. This will eliminate redirection chains and load the page faster.”
10. Upgrade Your Web Host
“One thing you can do is switch hosting accounts or upgrade your existing web hosting plan,” says Kevin Williams of SurgeStream.
“Often, our clients are hosting their websites with subpar hosting companies. Even if you were to tackle some of your website’s underlying technical issues that are slowing it down, if your web hosting provider is slow, your website is going to be slow,” Williams says.
Ian Wright of Businessfibre.co.uk saw first-hand the difference that investing in a better web hosting company makes:
“We switched to a faster host a year ago, and the difference was night and day. The new host costs ten times as much as what we were paying before, but we made back the extra cost through increased conversions due to faster page load times.”
When selecting a new website host, Muhammad Roohan of DRT SolutionZ recommends looking for “a cloud-based managed hosting provider.”
If you’re using shared hosting, Mailbird’s Andrea Loubier recommends “moving over to a dedicated server. Spending a little more money is very often well worth it!”
And both Khris Steven of Khrisdigital and IIWP’s Farasat Khan recommend choosing a host that offers its own content delivery network (CDN). After doing this, keep an eye on your web analytics dashboard to track your site’s performance.
11. Ask Your Hosting Provider for Help
Another option, according to Jessica Rhoades of Create IT Web Designs, is to “call your host company.”
“I test my website monthly and called my host because the web page was crawling at 5-7 seconds. The host cleared the cache and verified the other websites on the shared hosting plan were not causing my website to slow down. After that, my website was back to the usual 2-3 seconds loading,” Rhoades says.
Robert Rand of JetRails agrees and recommends “engaging with your web host to advise you on server-side speed optimization—from newer, faster hardware to CDNs and caching.”
12. Use a Premium DNS Provider
“Many clients we onboard are using domain registrars like Namecheap or GoDaddy as their DNS providers,” says Corey Trojanowski of Valve + Meter. “These are free DNS providers, which, sometimes, is all a business cares about. But saving a few bucks each month really gets you a slower experience for your visitors.”
“Switching to a premium DNS provider, like Cloudflare for example, provides your site with a much larger infrastructure and super-fast response times. When we’ve switched DNS providers for clients to more optimal options, we’ve seen site speeds increase as much as 40%,” Trojanowski says.
13. Use a Content Delivery Network
Another way to improve your site’s load speeds is to use a content delivery network (CDN).
“A CDN delivers static resources—such as images—on a network that’s been optimized for fast delivery around the globe,” says Rob Powell of Rob Powell Biz Blog. “Using a CDN will give you the biggest single improvement in page speed that you can get.”
“CDN refers to a geographically distributed group of servers that work together to provide fast delivery of internet content,” says Paul McIntosh of Siren Digital Marketing. “It allows for the quick transfer of assets needed for loading Internet content, including HTML pages, JavaScript files, stylesheets, images, and videos.”
“Having a CDN means that your content is accessible faster all around the world,” says Nate Masterson of Maple Holistics. “CDNs are easy to set up and are relatively affordable, making them a no-brainer for any site looking to boost its performance.”
“Most CDNs also come with in-built minification, which is a way of shortening your site’s code to enable faster file delivery,” says Growcode’s Paweł Ogonowski. “Code is usually designed to be legible to developers and often includes comments, commas, spaces, etc. But a browser doesn’t need all this extra information.”
“Minification essentially turns code into shorthand that browsers can understand. Minification can reduce file sizes by as much as 60%,” Ogonowski says.
So which CDN should you use? Most of our respondents recommended Cloudflare.
“Cloudflare will improve your website’s performance and your security as well,” says David Hepplewhite of Norgeseo.
Alpesh Shah of RevSystems says you can get a lot of benefits from “running your DNS and CDN though the free tier at Cloudflare. For no cost for most websites, you will get protection and speed.”
But Kris Gunnars of Search Facts recommends “adding the premium Cloudflare Argo feature for $5 a month. This will lead to a 30-70% reduction in time to first byte (TTFB) worldwide, which makes your site much faster.”
14. Enable Caching
Several respondents recommended enabling caching on your website.
“Caching works by rendering an immediate version of the page and then loading updates or other less pertinent pieces secondarily so there isn’t a delay in initial load time,” says Bonjoro’s Casey Hill.
“You can turn on this setting by doing some coding or using WordPress plugins,” says Ali Hasan of Film Jackets.
As far as WordPress plugins go, Alex Membrillo of Cardinal Digital Marketing recommends WP Super Cache and W3 Total Cache.
However, Vital Dollar’s Marc Andre says that “a lot of caching plugins have confusing settings, so if you’re not a developer, you may not be able to configure it correctly on your own. In some cases, you can even do more harm than good.”
“The easiest caching plugin that I’ve used is WP Rocket,” Andre says. “The correct settings are handled automatically, so anyone can use it. It’s a premium plugin, so you’ll need to pay for a license in order to use it, but it’s well worth the cost.”
“Sites that have full caching enabled can increase their site speeds drastically, sometimes by as much as from 0.9-2.4 seconds,” says Megan Jenkins of SimScale.
15. Implement Accelerated Mobile Pages (AMP)
“For brands that want to excel at mobile ecommerce, I recommend implementing Accelerated Mobile Pages (AMP),” says Revenue River’s Ron Smith. “AMP is a Google-driven technology that creates streamlined versions of your regular website pages that provide users with only the most critical information.”
“The AMP pages are stored on the search engine’s servers and are rendered almost instantaneously when a user clicks on your search result. While users view the AMP page, they are seamlessly transitioned to the full site in the background,” Smith says.
Implementing AMP may require more technical know-how than the average marketer or business owner has, but if you want to give it a shot, here’s some information from Google about creating AMP pages. There are also official AMP plugins for WordPress and Drupal.
Is Spending Time on Website Speed Optimization Worth It?
All of these website speed optimizations take time to implement, and some will take considerable time to implement. This begs the question: is it worth it?
To help you answer that question, we’ll close with a case study shared by GreenPal’s Zach Hendrix:
“This year, we worked with a top-notch search engine optimization expert who did a full audit on our website, and after paying him $15,000, he came back with a list of recommendations. At the top of the list was improving the speed of our website.”
“I thought to myself, ‘yeah right.’ I didn’t really think improving the speed would help all that much.”
“Boy was I wrong.”
“Using Google’s Lighthouse tool, we slowly began tackling issues on our webpages such as compressing image sizes and reducing the time to first paint on our site.”
“The project took three months to complete, but after we launched the new, updated, faster pages, we saw immediate ranking increases and an overall 3% increase in conversions on those pages.”
“Google really does reward faster pages, and faster pages really do convert better. So it kind of creates a snowball effect in which improving your rankings and conversion rates both reinforce each other.”
In closing, Hendrix says, “I would encourage all business owners to invest the time and resources in improving their site speed for increased sales.”


