Table of contents
We’ve all been there.
We’ve been looking for an important piece of information for a while, and finally, it seems we’ve managed to track it down.
But wait!
It’s a 404 error, the page no longer exists, and we have to go back to the drawing board.
When it comes to running your own site, 404 errors are no less annoying. While an occasional one isn’t a big deal and shouldn’t affect the ranking of your page, having multiple recurring errors can negatively impact your SEO.
In addition, it significantly lowers the quality of user experience, possibly costing you conversions.
That’s why it’s important to keep track of 404 errors as they pop up, hopefully before too many users run into them. You can accomplish that with good reporting practices and by relying on Google Analytics Reports that will help you monitor, find, and fix 404 errors.
As you monitor 404 errors, the challenge isn’t just collecting the data, it’s interpreting what’s actually happening. Instead of manually digging through reports to understand patterns, teams now use AI data analysts, like Databox MCP, to ask simple questions about performance and get answers based on their real metrics and historical trends. For example, you can ask why 404 errors increased during a specific period and get a clear explanation grounded in your actual traffic data, helping you quickly identify whether the issue is technical, structural, or campaign-related.
Learn everything there is about Google Analytics 404 reports as we cover the following:
- What’s a 404 Error?
- Why is the Goole Analytics 404 Report Important?
- How to Quickly find 404 Errors in Google Analytics
- How to Track 404 Errors in Google Tag Manager
- How to Create a Custom Report for Finding and Fixing 404 Errors in Google Analytics
- How to Set Up Alerts for 404 Error Increase
- How to Check 404 Errors in Google Analytics 4
- How to Track 500 Errors in Google Analytics
- 404 Page SEO Best Practices
- How to Automate 404 Error Reporting with Databox

What’s a 404 Error?
This really isn’t that complicated: a 404 error is a status code. These status codes are simply your browser’s way of telling you that your page couldn’t be found. There are many reasons for the occurrence of a 404 error. The page may no longer be” there” — due to a changed URL or the page being deleted. Perhaps the user typed in the wrong URL, or the link they clicked had a typo. Even server errors or bad redirect commands can be the culprits.
Regardless of the cause, 404 errors show that something has gone wrong, and they can have lasting consequences to brand reputation because of poor user experience. At least, if they’re not dealt with.
Why Is the Google Analytics 404 Report Important?
Google Analytics makes the process of tracking 404 errors much easier. You can spot them automatically without having to trawl through densely packed information in an SEO audit tool.
Google Analytics 404 reports will help you identify user activity that has led to unforeseen situations, allowing you to deal with it in a timely fashion. In addition, by seeing the exact timeline of 404 events, you’ll be able to correlate spikes in error reports with changes in website structure, link-building campaigns, and other factors. That way, you’ll be able to track down and handle the root cause of these errors.
How to Quickly Find 404 Errors in Google Analytics
Google Analytics reporting is incredibly useful, but tracking down 404 errors can be tricky unless you know what you’re doing. There are three main ways you can find them — based on the page title, based on the URL, and based on a custom event.
Based on the page title
Most 404 pages have a title that contains “Page not found” or something similar. Knowing that, find out how your website identifies pages that return a 404 error.
First, open Google Analytics and navigate to the “Behavior” option. Once there, click on “Site Content” followed by “All Pages.”
Next, you should switch the Primary Dimension to “Page Title.”

Finally, type the page title of your 404 pages into the search box and click on the result.

And you’re done! You have your Google Analytics 404 report.

If you wish, you can sort pages by the number of views in order to see the most frequently appearing errors.
Based on page URL
Some websites work somewhat differently. When a 404 error occurs, they redirect or rewrite the URL. While this isn’t the best approach, some WordPress plugins use it.
If you have a website like at, the first steps are similar to the ones above. Go to the “Behavior” option in Google Analytics, click on “Site Content,” and then “All pages.” After that, type 404 or a similar identifier in the search box.
You should be able to get information about 404 errors on your website from there.
Based on a custom event
If none of the above options works, you probably need to create a custom event to track 404 errors that pop up.
This isn’t that complicated, and you just need to place a piece of JavaScript code into the body of the template you’re using for 404 pages.
Here’s an example:
<script>
    ga('send', {
      hitType: 'event',
      eventCategory: '404 Error,
      eventAction: window.location.href,
      eventLabel: document.referrer
 	 });
</script>
After that, you’ll be able to search for 404 errors by navigating to “Behavior,” clicking on “Events,” and picking “Top Events” in Google Analytics.
This approach is a bit more complex and requires editing of the 404 template, which you may not be able to do.
In addition, you won’t be able to see the history of 404 errors. The tracking begins once you add the code, so you’ll need to wait for the error to be triggered to see results.
How to Track 404 Errors in Google Tag Manager
Google Analytics shows you only errors that have already occurred. Unless you’re checking them very frequently, you’ll only be able to respond when doing your scheduled checkup. To make sure you’re dealing with them quickly enough, you can use Google Tag Manager and monitor them in real-time.
Create a variable
First, we need to create a variable that will check the page title — “404: Page Not Found,” for example.
To do that, go to “Variables,” click “Create,” and edit the fields name, variable type, and global variable. You can name it what you want, but “JS – Page Title” or “JavaScript – Page Title” should do the trick. The variable type should be “JavaScript variable,” while the global variable name needs to be “document.title.”

This variable will report the name of the web page visitor encountered.
Create a trigger
Next, we need to create a trigger that will activate once the 404 page is viewed. Make sure your string matches the 404 page title and only the 404 page title. You don’t want regular functioning pages showing up in your report.

Give your trigger a name that will be easy to identify — “Pageviews – 404 page” is a perfectly acceptable name. Then, select “Page View” as the trigger type and ensure it fires on “Some Page Views.”
Finally, define firing conditions. Select the variable you just defined and enter a pattern that matches it. For example: contains “Page not found.”
Now you have a trigger that fires whenever a user visits a page with the specified title.
Create a tag
Just knowing how frequently they occur doesn’t help us actually fix 404 errors. We need to know the URL of the broken link and the URL of the page that contains it.
This Custom Event Tag sends information directly into Google Analytics, allowing us to spot and fix the errors easily.
As with the variable and trigger, we need to name the tag. After that, we need to select the recently made trigger from the “Triggering” section and click “Tag Configuration.” There, we can select “Google Analytics: Universal Analytics.” Define “Event” as “Track Type” — this will trigger the event when a user visits a 404 page. The “Event Category” can be defined as “404 Errors.” Using {{Page Path}} for “Action” allows you to see which URLs return the 404 error, and the “Label” {{Referrer}} will help you locate the broken links on your own site.

Lastly, in “Google Analytics Settings,” you should add the GA Variable of your Google Analytics Account. This is a unique tracking code that begins with UA.
After you’ve saved the tag, you can click “Preview” to use GTM’s debugging mode and test if your tag is firing properly. If everything is working correctly, click “Submit” and publish the container.
How to Create a Custom Report for Finding and Fixing 404 Errors in Google Analytics
If your website is set up correctly, Google Analytics should already be tracking 404 errors automatically. You can then use custom reports that will help you find and fix them. We’ll present you reports that are based on 404 errors originating from internal links and external links. That way, you’ll know if the error is originating on your website or somewhere else.
Internal links, as their name implies, lead from one page on your site to another. This is a handy report that can help you find these types of links that are triggering the 404 errors. The good thing about them is that, since you have full control over them, they’re easy to fix. However, if not addressed, they harm user experience and can even damage your SEO.
External links lead to your website from another. Since you don’t have direct control over them, any errors caused by external links can be difficult to deal with.
How to build a custom report for 404 errors from internal links
First, create a “New Custom Report in Google Analytics and select a “Flat Table” as a report type. The dimensions should be “Page,” “Page Title,” and” Previous Page Path,” while the metric should be “Unique Pageviews.”
Next, you want to make sure to see only errors triggered by navigating from internal pages on your website. To do this, you should add a filter that excludes the value “(entrance)” for the dimension “Previous Page Path.”

Finally, add another filter field that will identify your 404 page. It will check the title of the page for a unique identifier such as “404” or Page Not Found. This is an “Include” filter for the dimension Page Title.
When you save and open it, you’ll be able to see the URL that triggered the error, the page that links to the triggering URL, the title of your 404 page, and the number of times the error occurred.
How to build the report for 404 errors from external links
Same as before, open Google Analytics, create a New Custom Report, and select a “Flat Table” as a report type. Set dimensions as “Page,” “Page Title,” and “Full Referrer.” The metric should be “Unique Pageviews,” as in the previous report.
Now, unlike with the internal link 404 report, you want to see only errors triggered by an external page. So, set up a filter that includes the value “(entrance)” for the dimension “Previous Page Path.”

In the end, you should add a filter that identifies the 404 error page. As above, this is an “Include” filter for the dimension “Page Title.” It will check the title of the page for a unique identifier such as 404, Page Not Found, or whatever else is on your 404 error page.
This will generate the same report as the report for 404 errors from internal links.
How to Set Up Alerts for 404 Error Increase
While having a report about previous errors is good, setting up an alert that will notify you of new errors is better. This allows you to deal with them immediately and minimize user friction.
Here’s how to do it:
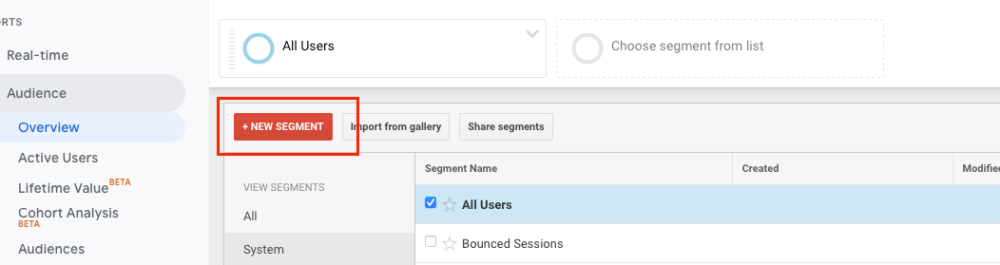
In Google Analytics, add a new segment. You can do this by clicking “+Add Segment” and then select “+NEW SEGMENT” from the list.

Name your new segment, go to “Conditions” and set up a condition that matches something unique to your 404 page template. You can simply go with a page title as the filter and use the title of your 404 page.
After you’ve saved your segment, you want to create a notification. Navigate to the admin panel and go to “Custom Alerts.” Click on “+New Alert” and choose the segment you created in the “This applies to” field.

You can configure the alert to suit your preferences. For example, when sessions increase by a certain percentage value over a specific period. It’s a good idea to start with a lower threshold and modify it as needed. You neither want to be swamped with alerts nor to miss important ones.
How to Check 404 Errors in Google Analytics 4
The steps above apply if you’re using the older version of Google Analytics (now known as Universal). However, Google has recently rebranded its App+Web analytics toolkit as Google Analytics 4 and started pushing it as the default on new accounts.
If you’re using Google Analytics 4, there are some differences but the basic principles are the same. Instead of “Behavior” and “Site Content,” navigate to “Analysis” and “Exploration.”
“Page Title” and “Page path + query string” need to be set up as dimensions, and metrics should be “Active users.” After that, drag “Page path + query string” to Rows and “Active users” to Values in the “Tabs” section. You can also select them by clicking on appropriate buttons if you find it easier.

The last step is to set up the filter. Use the same rule as in Google Analytics Universal: Page Title needs to contain a string that’s unique to the title of your 404 page.
Once you’re done, click “Apply,” and Google Analytics 4 will create the report about 404 errors.
How to Track 500 Errors in Google Analytics
Of course, 404 isn’t the only status code you should worry about. The 5XX range of errors can be harder to discover and pose an even bigger problem. The most common type is 500: Internal Server Error.
Server errors are much rarer and go unnoticed on a significant number of websites. Fortunately, you can use a custom 500 page that will contain a Google Analytics tracking code.
The process is fairly simple. If your host is running Apache, simply edit the .htaccess file by adding the following string:
ErrorDocument 500 /your-custom-500-error-page.htmlIf not, check with your hosting provider on how to set this up.
Once you’re done, follow the same steps as with 404 pages to track 500 errors.
PRO TIP: How to Monitor and Evaluate Your SEO Performance
If you want to understand how your visitors are behaving on your landing pages, there are several on-page events and metrics you can track from Google Analytics 4 and Google Search Console that will help:
- Organic clicks by queries. Which search queries generate the most clicks to your website?
- Organic clicks by page. Which pages receive the most clicks from search results pages?
- Organic sessions. How many organic search sessions does your website receive?
- Organic engaged sessions. How many website visitors were engaged with your content? An engaged session lasts longer than 10 seconds, has a conversion event, or has at least 2 pageviews or screenviews.
- Views per channel. Which channels generate the most views to your website?
And more…
Now you can benefit from the experience of our SEO and website conversion experts, who have put together a plug-and-play Databox template showing the most important metrics for monitoring your landing page performance. It’s simple to implement and start using as a standalone dashboard or in marketing reports!

You can easily set it up in just a few clicks – no coding required.
To set up the dashboard, follow these 3 simple steps:
Step 1: Get the template
Step 2: Connect your Google Analytics 4 and Google Search Console accounts with Databox.
Step 3: Watch your dashboard populate in seconds.
404 Page SEO Best Practices
While 404 pages won’t affect your website’s performance, they aren’t great for user experience, and broken links might negatively impact your SEO if left unattended.
So here are some best practices on how to ensure your 404 pages have minimal negative consequences:
- Explain what went wrong to the user — users appreciate transparency, and you’ll minimize the negative user experience.
- Include a simplified sitemap that can help the user to navigate to where they want to be. Make sure to include resources that are being searched the most.
- Include a link to your contact page or contact information to gather additional feedback from the users. This will make it easier to resolve any issues.
- Make sure to include a unique string we talked about above — 404, Page Not Found, or something else. This will make it easier for you to track it in Google Analytics.
- If it’s an external link, consider setting it to 301-redirect to another relevant page.
- In the case of internal links, update all that redirect to non-existent pages or have typos.
- If the page generated significant traffic to the site in the last 90 days, consider redirecting it.
- If the URL shouldn’t exist, you can simply ignore it and create the SEO-friendly version of the 404 error page. Alternatively, you can submit a URL removal request in Google Search Console.
Automate 404 Error Reporting with Databox
It appears that 404 errors simply can’t be avoided. However, tracking them, analyzing reports, and fixing underlying issues can definitely minimize their negative impact.
Databox’s reporting tools be linked with Google Analytics and provide detailed and easy-to-understand reports. You won’t have to trawl through rows and columns; in fact, you’ll be able to design a fully customized dashboard that will show you all the relevant data in the intervals you want.
But that’s not all. Databox Alerts can notify you as soon as the error occurs, allowing you to fix that instance immediately. You can be notified via email, Slack, mobile push notification, or via the Insights stream, whatever is more convenient for you. Try out Databox for free today by signing up for a trial.