Table of contents
75% of sales managers say that using a Customer Relationship Management (CRM) system helps them increase sales and companies who invest in a CRM generate a 50% return on their investment. Yet, more than half of all small businesses use manual methods – like spreadsheets and whiteboards – to keep track of deals and customers.
What prevents companies from benefiting from the efficiency, effectiveness and revenue gains that come with the use of a CRM? Many don’t bother because of the effort required to setup and the ongoing effort to keep the CRM updated.
But, what if both of those time sucks were avoidable? And what if the CRM were free forever, to boot?
That’s exactly what HubSpot made possible when it launched its free CRM several years ago. The HubSpot product team has focused on making setup simple and ongoing use effortless.
And they’ve done an amazing job. At Databox, we’re avid users of the CRM, using it to effortlessly keep track of our sales pursuits and communication with prospects.
But, setting up the CRM does require a small bit of effort and planning upfront. Here are the nine steps you need to complete to fully take advantage of HubSpot’s free CRM.

Follow the steps in this specific order, starting at the top, though. This list is designed to give you insight into your sales funnel immediately and with as little effort as possible. Finish the list to get the full benefit of the free CRM. If you’re already using HubSpot CRM or HubSpot’s Marketing tools, I’ve also included some advanced tips from some advanced users.
1. Set Up a Free CRM Account For Your Company.
The first step to using HubSpot’s CRM is to setup an account for your company. All you need is your email address and domain name to create an account.
If you’re a HubSpot customer already, follow these instructions instead.
Approximate time: 5 Minutes
2. Integrate Your Team Members’ Email Inboxes
Your salespeople can automatically log new prospects and the email messages they send them by integrating HubSpot’s CRM with Gmail or Outlook.
Once integrated, they’ll see a checkbox to copy all messages they send right to the right contact in your CRM.
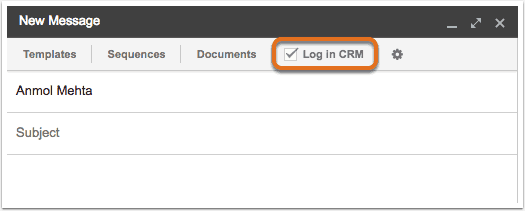
Simply add team members as users and tell them to download the extension. Here are full instructions for adding the gmail or outlook extension.
Once they begin using the extension, you will immediately see your sales team’s email activity within the CRM.
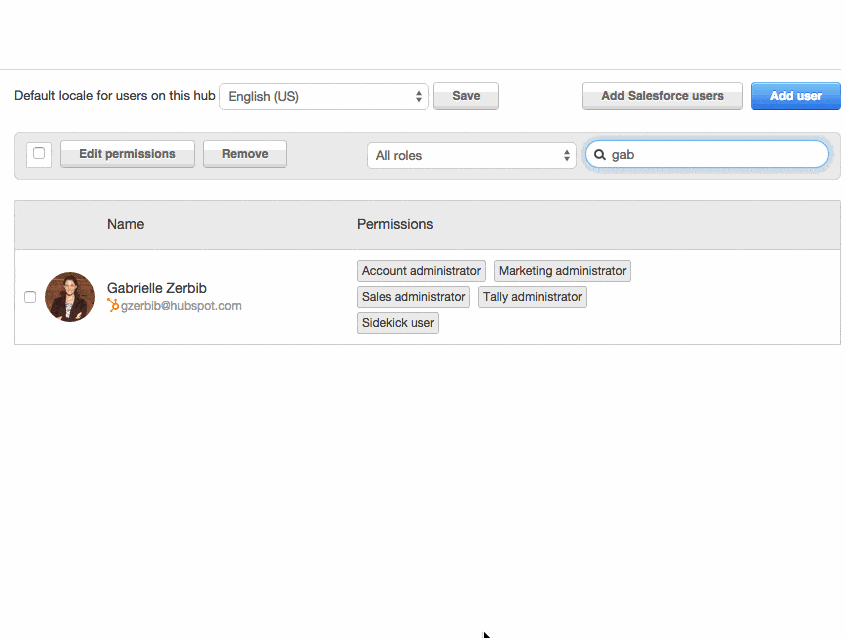
When adding salespeople to your CRM, add them as “users”, “managers” or “administrators”. Administrators have the ability to add and delete other users.
For all roles, you can granularly set permissions to restrict or allow users to do the following:
- view all data in your CRM or just contacts, companies, deals that are assigned to them
- edit all data in your CRM or just contacts, companies, deals that are assigned to them
- bulk delete data
- import data
- export data
I’m a big fan of leaving everything open, but depending on your sales organization’s culture and maturity, you might want to at least prevent salespeople from exporting or bulk deleting data. Even Dean, Principal Agency Consultant at HubSpot says, “Setting the right permissions is a commonly missed step in the CRM process and can tempt poor behavior among sales reps. Sales managers are always asking me how they can limit their rep’s rights to manipulate data.”
Approximate time: 10 minutes
3. Define Deal Stages to Track Deals
Perhaps the most valuable function of a CRM – other than keeping your team’s contacts and communications in one central place – is keeping track of active deals.
But, before you can track deals, you must define deal stages. Use stages to track whether an opportunity is brand new, qualified, ready to close or something else. Different companies use different stages based on how complex or simple their sales process is.
Here is an example set of stages you could use:
- Connected. You connected with a prospect and agreed there is an opportunity for your to help. The output of this step of the process is to schedule an exploratory or qualification call or closed lost.
- Exploratory Completed. You’ve determined that you are mutually qualified to do business together. The output of this step of the process is to schedule a presentation or planning call or closed lost.
- Presentation Completed. You’ve presented a plan to your prospect and they’ve verbally agreed to move forward. The next step after this call is to create and send a contract for execution or closed lost.
- Contract Delivered: You sent the contract and are waiting for your prospect to sign and issue payment or closed lost.
- Closed Won: Contract is signed.
- Closed Lost: Deal is no longer active. They or you decided not to pursue the deal further at this time.
To forecast correctly, assign a percent close likelihood to each stage. For example, you might forecast a deal at the “exploratory process completed” stage with a 25% chance of closing and a deal where the contract was delivered as 90%.
If you need help thinking through what stages your company should use, read this guide or take HubSpot’s free sales training.
There’s no hard and fast rules around what deal stages you should use. “We have a client who sets up deals even before a connection is made,” says John McTigue, EVP at HubSpot Diamond Partner, Kuno Creative. McTigue explained, “They even estimate the deal size by looking at the characteristics of the company. By creating a deal and estimating revenue potential, they are better able to focus on the pursuit of the right companies.”
But, no matter what stages you use and what names you call them, define your deal stages in the CRM so that you can organize your funnel and forecast deals.
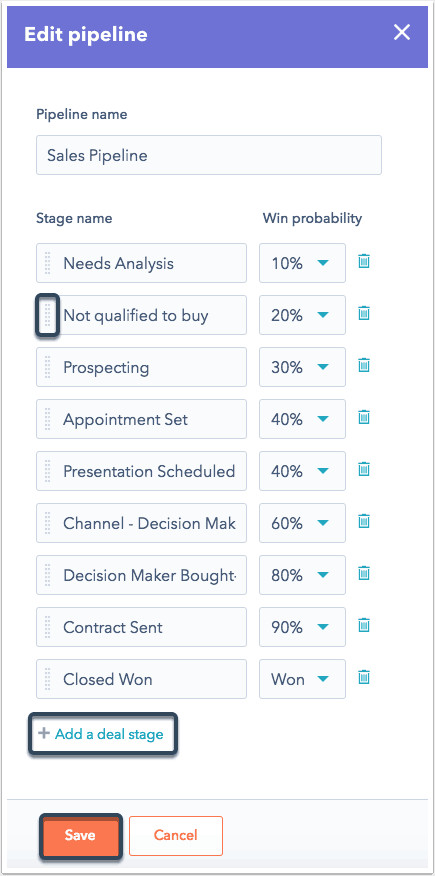
Approximate setup time: 30 minutes
Once deal stages are defined, your salespeople can drag and drop deals into the different stages.
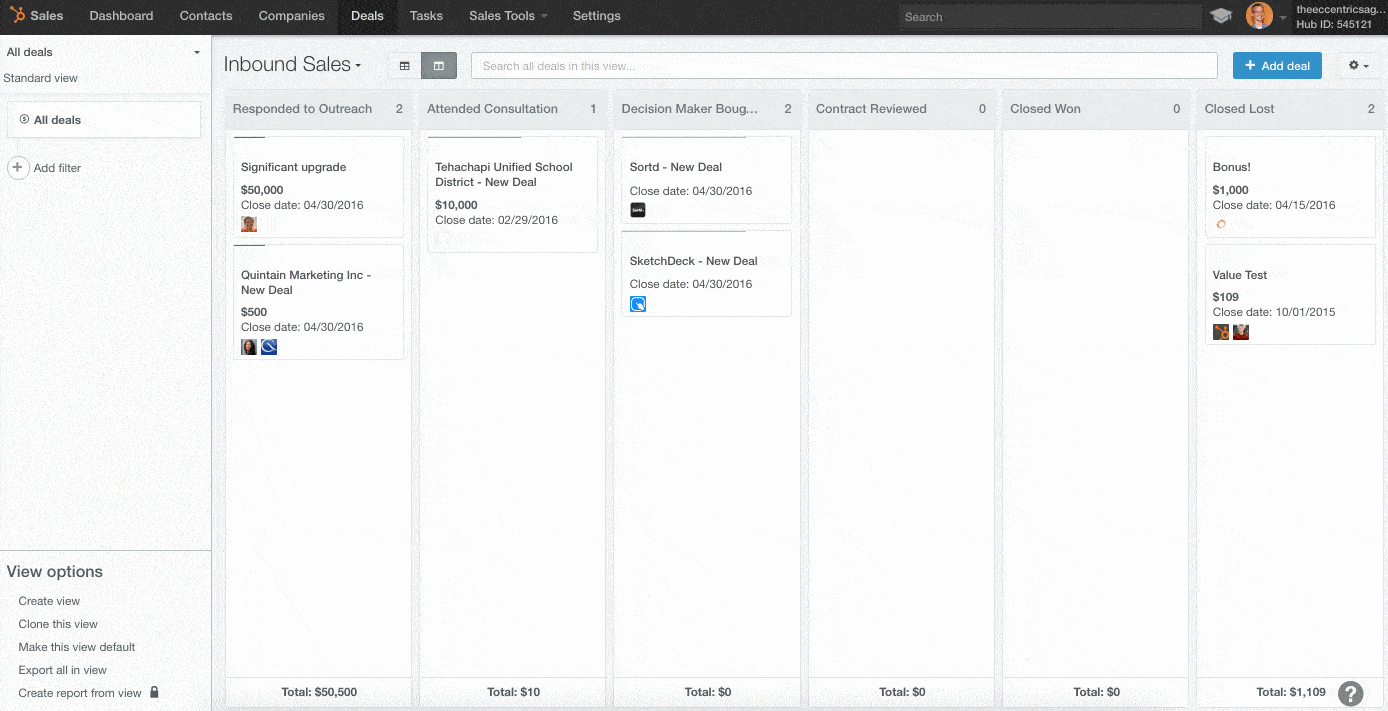
Watch this video to see how deal stages help you manage your funnel and forecast.
PRO TIP: Visualize Your Sales Funnel and Take Control
Understanding your sales funnel can help you identify where sales prospecting, lead management, and sales processes might need some improvement. . Now you can take control and optimize your sales funnel, but first, you need to monitor the right KPIs:
- Paid Signups Per Day. How many website visitors have signed up in response to your sales and marketing efforts?
- Conversion Rate Through Funnel. See how effective your sales funnel is over time, and how efficient is your sales process at converting visitors to leads and leads to customers?
- Top of Funnel Additions. See how many qualified leads and opportunities you get from top-of-funnel marketing efforts.
- Top Closers this Month. Determine which team members are hitting their monthly sales targets and closing the most deals.
Now you can benefit from the experience of our HubSpot CRM experts, who have put together a plug-and-play Databox template showing some of the most important metrics for monitoring and growing your sales funnel. It’s simple to implement and start using as a standalone dashboard or in sales reports, and best of all, it’s free!

You can easily set it up in just a few clicks – no coding required.
To set up the dashboard, follow these 3 simple steps:
Step 1: Get the template
Step 2: Connect your HubSpot account with Databox.
Step 3: Watch your dashboard populate in seconds.
4. Automatically Add Website Leads into Your CRM
Once you have your team using the software to track contacts, email communications and deals, it’s time to think about where your leads will come from. Hopefully, you have multiple sources of quality leads. Anyone who gets inbound web leads knows, one of the best sources of leads are inbound leads from your company’s website.
To automatically enter leads captured on your website into your CRM, create a HubSpot Marketing Free account another free product from HubSpot. Once setup, prospects who complete any form on your site will automatically be entered as contacts into your CRM.
It’ll also start tracking what pages they view and when they return to your website, giving your sales reps more opportunities to connect with them and schedule a call.
If you’re a HubSpot marketing software customer already, you can skip this step altogether. HubSpot’s marketing software and sales software share a common contact database, so any lead you capture via HubSpot’s marketing software will automatically be visible to your salespeople.
Approximate time: 15 minutes
5. Distribute Leads to Your Sales Reps
With HubSpot’s free CRM, you can manually assign contacts, companies and deals to reps. Any deal they create is automatically assigned to them too. When you upload leads, you can assign them too.
But, if you have a large amount of inbound leads and you want to rotate them evenly amongst your salespeople, you can do this if you’re a HubSpot Professional customer with access to Workflows.
Approximate time: 30 minutes
6. Define Custom Fields for Information You Want to Store about Contacts, Companies and Deals
Is there specific information you want to collect from your contacts or ask your salespeople to enter into your CRM. You can define custom fields for your contacts, companies and deals.
Maybe you want to know how many employees are in your prospect’s IT team? Add a field called “Num IT employees” to the Company record. Want to capture your contacts’ favorite sports teams? Add “fave sports team” as a custom field for the contact record. Maybe you want to capture a description of the decision making process as your reps work deals. Store it in a separate field on the deal property. Maybe use a dropdown where salespeople select one of a few options, so you can sort it or run a report off of it down the road.
“Think strategically about what information you want to collect about your contacts.” McTigue recommends. For example, one of Kuno Creative’s client is a professional services company that provides four different consulting services to healthcare, insurance, retail and manufacturing companies with greater than $500M in revenue. To ensure effective communication and lead handoffs between their marketing teams, sales development reps and closing reps, they collect data on industry, job title and company size. “Once they connect, the SDRs also populate fields in the CRM that capture which of their four services interest the prospect. This allows us to segment their contacts into lists and send targeted marketing campaigns based on the prospect’s interest.”
In the beginning, don’t over-engineer this more than it needs to be. You might have trouble getting contacts to fill out long forms on your website and even more of a challenge convincing your sales team to enter custom information manually. You can also add custom fields at any point in the future.
Approximate time: 30 minutes
7. Upload Historical Data
Another source of high quality leads might be your existing customers, referrals, previous prospects or a list of new, target contacts. If you haven’t used a CRM previously, it might make sense for you to let the system add these people automatically once your sales reps email them again. But, if you have them in a spreadsheet (or CSV file) or can get them into one, you can easily upload your contact, company and deal data.
McTigue recommends doing a review of contact data prior to import, “Clean out bad and stale contacts. Use an email validation tool to check for bogus contact data.”
“For people who haven’t used a CRM before, I recommend exporting their Outlook or Gmail contacts and uploading them into the CRM,” says Chris Strom, Owner of Gold HubSpot Partner, ClearPivot. “Before uploading, trim the exported list down to remove irrelevant contacts.”
Approximate time: 15 minutes
8. Define Lead Stages to Organize Prospecting
Most companies don’t create a deal until they’ve verified an opportunity exists. So, when your salespeople are working leads (or contacts), they’ll want to keep track of who they’ve called or emailed and whether they should continue to reach out.
By default, HubSpot creates a lead stage field on your contact records and auto-populates it with a few options: New, Open, In Progress, Open Deal and Unqualified.
Lead stages are meant to help a salesperson keep track of a call list, so they know who to call next and who to call a second, third, fourth, etc time. HubSpot’s CRM also has a call queue and task functionality to help salespeople keep themselves organized.
Approximate time: 15 minutes
HubSpot’s paid marketing software also has a concept called ‘lifecycle stages’ which are used to capture the interest and qualification level of prospects. McTigue explains, “We use a combination of buyer persona definitions and lead behavior to trigger changes in the lifecycle stage of a contact. For example, when a lead from a certain sized company requests a consultation through a client’s website, we usually change the lifecycle stage to Sales Qualified Lead (SQL). Most of our clients prioritize sales outreach to SQLs first.” More advanced HubSpot customers often use this type of lead scoring to help manage which leads are sent to sales in the first place.
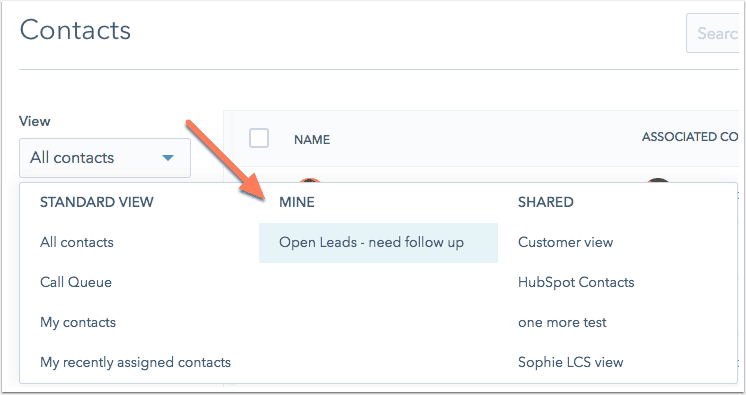
9. Create Custom Views of Contacts & Deals
Once you’ve defined lead and deal stages, you’ll need a way to stay organized about your sales pursuits.
Specifically, you’ll want to organize your sales rep’s prospecting time so that they are spending time initiating conversation with new prospects, making multiple attempts to contact leads and working their deals. So, at a minimum, you’ll want to create a view of new leads, in progress leads and active deals.
Once you create lead views for them, they’ll be able to access all of their views very easily from within the CRM. They can even create their own if they’d like.
Approximate time: 15 minutes
10. Create reports to track results
Once you’ve setup the CRM, you’ll want to train your team how to use it to their benefit. The beauty of HubSpot’s CRM Is that it works in the background for reps. Instead of cutting and pasting email conversations into the CRM, they are automatically captured and attached to the right contacts, companies and deals.
But, that doesn’t mean your reps never need to log in. Tracking their deals in the right deal stages is the most important habit you’ll need them to develop.
To reinforce the importance of this habit, and to measure your team’s performance, you can use Databox’s free reporting app. We’ve built a connector for HubSpot’s CRM that automatically pulls in your CRM performance data via HubSpot’s API. Here’s an example of a high level, real-time dashboard you can use to track your sales activity and results:
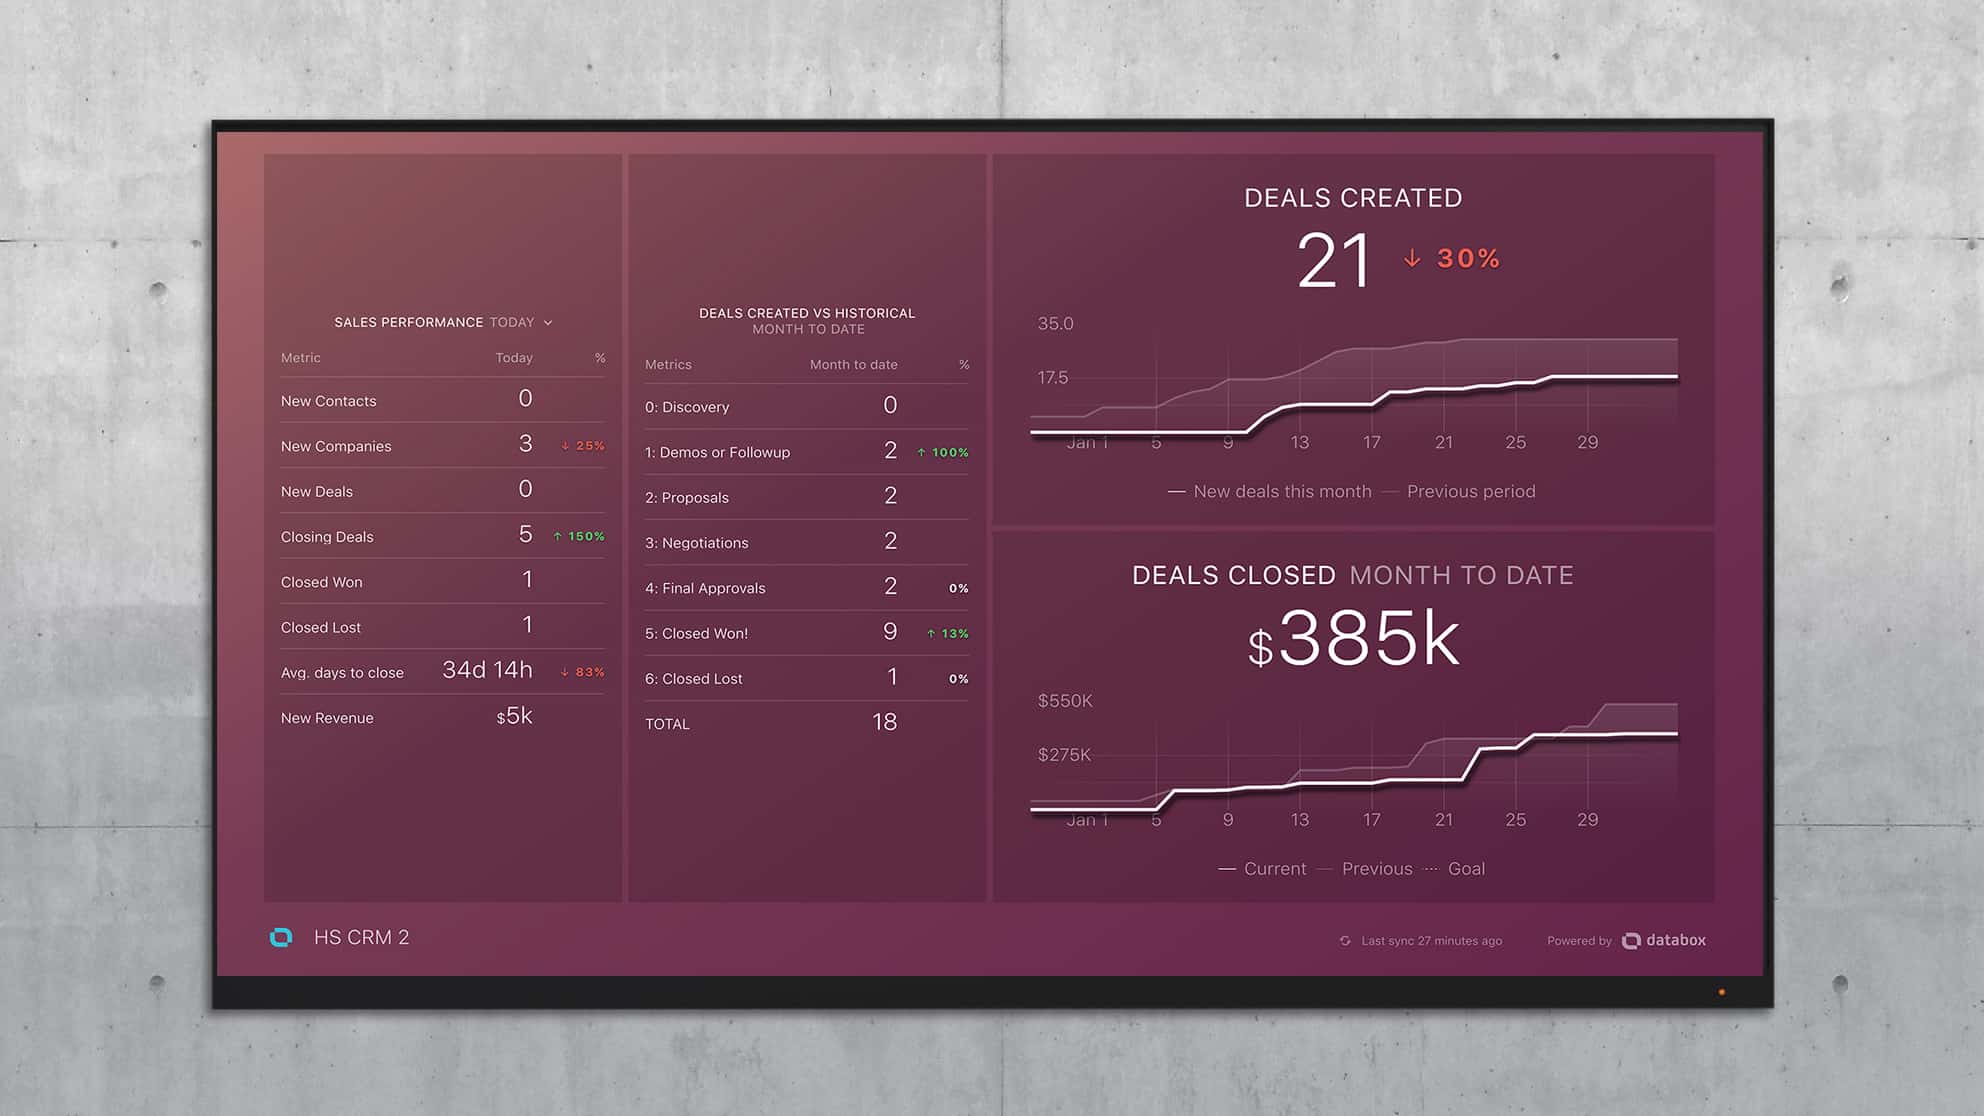
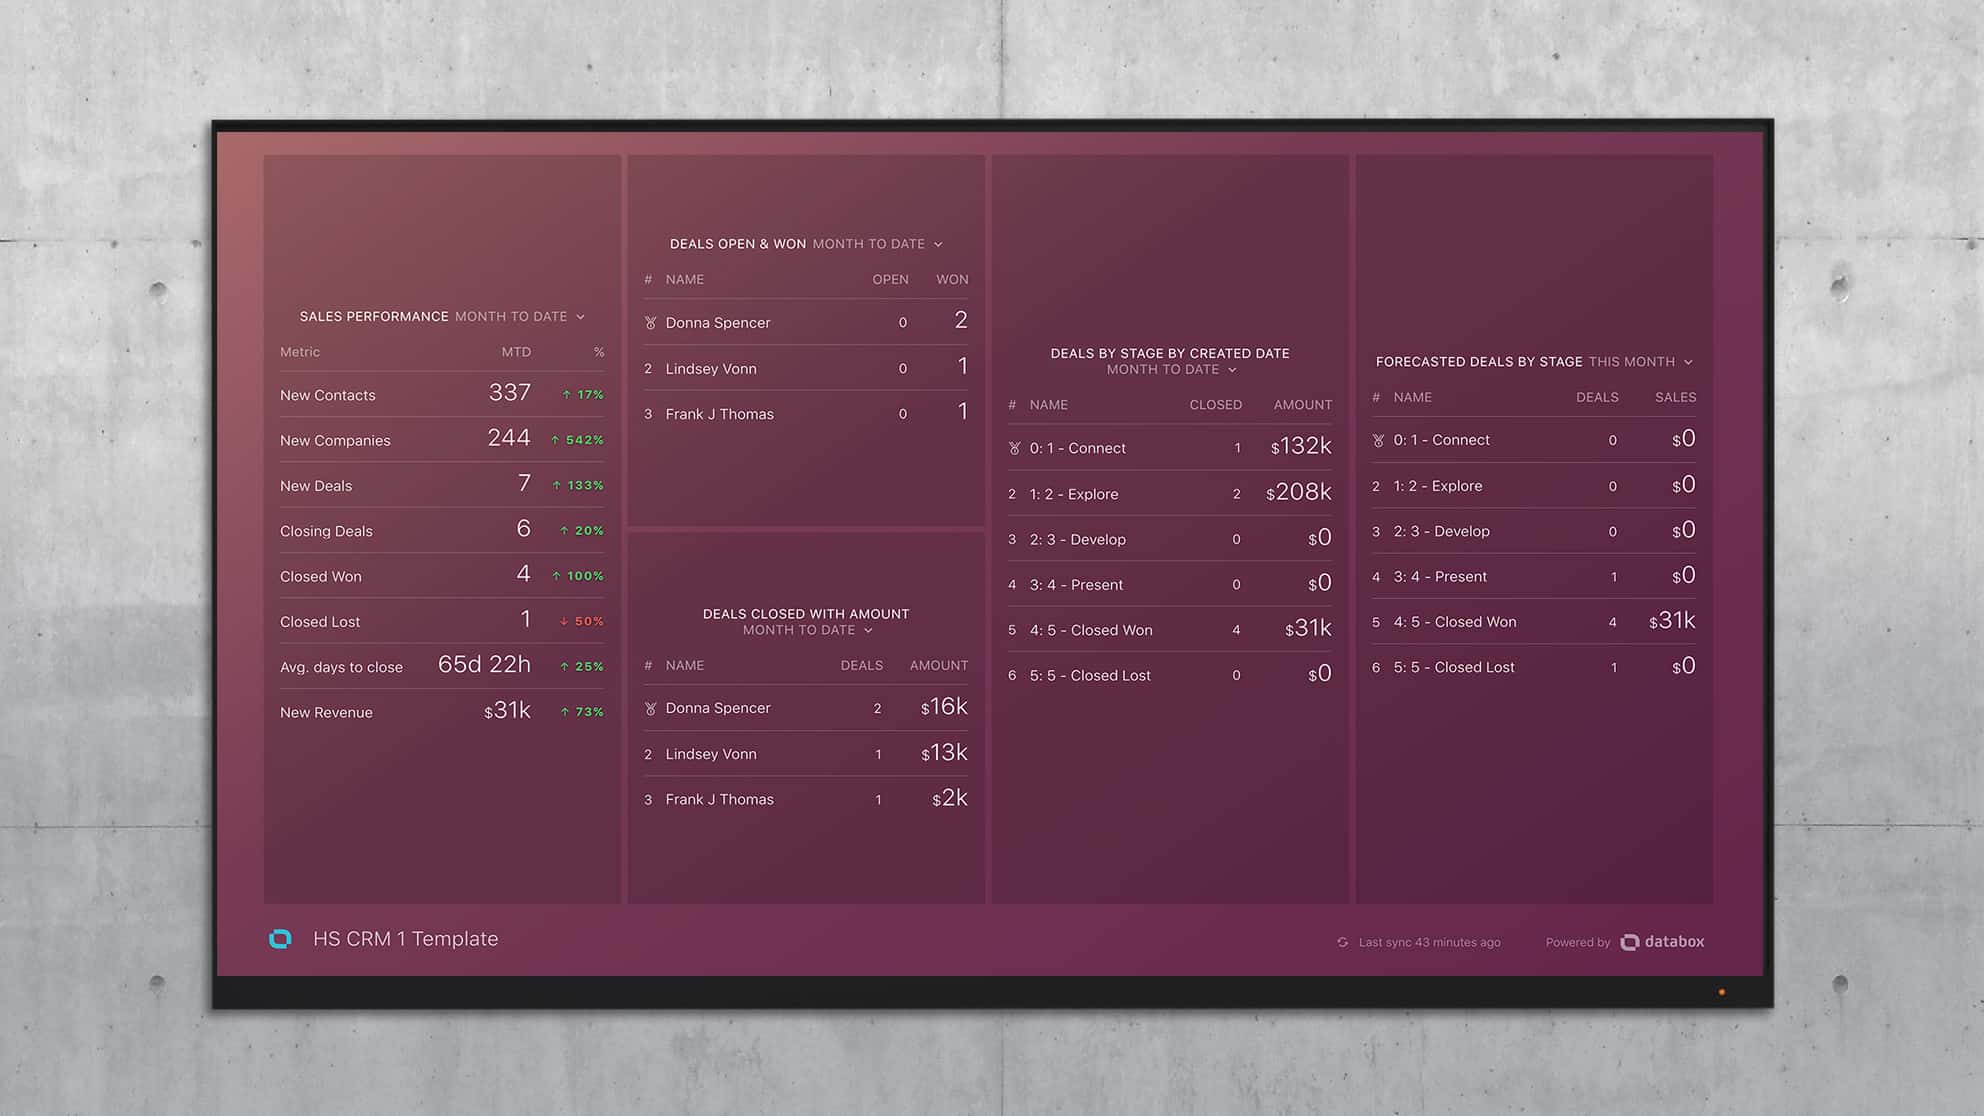
With Databox, you can project the team and individual’s performance up on a television in the office, bookmark a report on your desktop or get your team to download the mobile app to track their own stats. Below is an example of a report that shows the overall team’s results as well as a leaderboard to show who is creating and closing the most deals and revenue.
HubSpot’s CRM also provides some free reports right within the CRM. And they offer a paid reporting add-on which enables much more sophisticated analysis of your sales and marketing funnel.
Approximate time: 10 minutes
There’s No Excuse for Not Using a CRM
With HubSpot’s free CRM, there’s no longer any excuse for using spreadsheets and whiteboards to track your leads and deals. Not only is it free, it’s easy to setup and enables your team to stay organized with minimal effort through their inbox integrations.
Still not convinced? Check out one of the many advantages of using a CRM – in this case, tracking close rate by individual sales rep.
Are you using HubSpot CRM? In the comments below, tell us how you’ve set it up, how you’re using it, and how it’s helped you.